Categories
Linux

Basic HA NFS Server with Keepalived

Aim

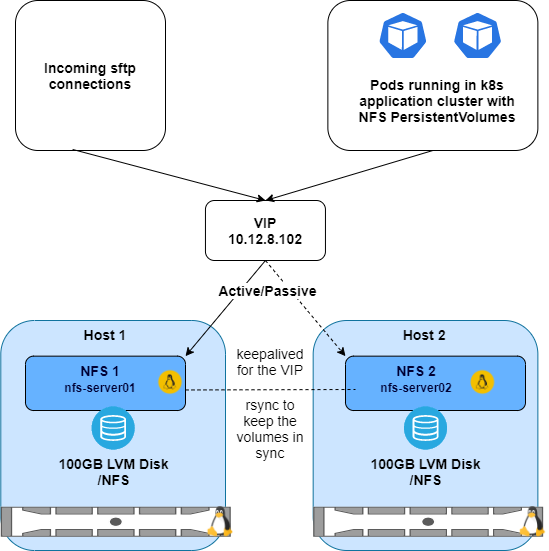
Create a simple NFS HA cluster on RHEL7 VMs with local storage as shown below. The VMs run as guests on a RHEL 8 server running KVM. Connections with be made from the local network and pods running in a Kubernetes cluster will mount as PersistentVolumes.

Also I will create a SFTP chroot jail for incoming client sftp connections.

Logical diagram

Prerequisites

Install and enable nfs, keepalived and rsync packages
sudo yum install -y nfs-utils keepalived rsync

sudo systemctl enable nfs-server
sudo systemctl enable keepalived

keepalived --version
Get IP info
[istacey@nfs-server01 ~]$ ip --brief a s
lo               UNKNOWN        127.0.0.1/8 ::1/128
eth0             UP             10.12.6.111/25 fe80::5054:ff:fe79:79b3/64
eth1             UP             192.168.112.111/24 fe80::5054:ff:fe06:8dc5/64
eth2             UP             10.12.8.103/28 fe80::5054:ff:fec6:428f/64

[istacey@nfs-server02 ~]$ ip --brief a s
lo               UNKNOWN        127.0.0.1/8 ::1/128
eth0             UP             10.12.6.112/25 fe80::5054:ff:fef5:765e/64
eth1             UP             192.168.112.112/24 fe80::5054:ff:fead:fa64/64
eth2             UP             10.12.8.104/28 fe80::5054:ff:fef5:13de/64

VIP DETAILS:
VIP – NSF nfsvip 10.12.8.102
NSF_01 nfs-server01 10.12.8.103
NSF_02 nfs-server02 10.12.8.104

Configure keepalived

Server 1

[istacey@nfs-server01 ~]$ cat /etc/keepalived/keepalived.conf
! Configuration File for keepalived

vrrp_instance VI_1 {
    state MASTER
    interface eth2
    virtual_router_id 51
    priority 255
    advert_int 1
    authentication {
        auth_type PASS
        auth_pass 1111
    }
    virtual_ipaddress {
        10.12.8.102
    }
}

Server 2:

[istacey@nfs-server02 ~]$ cat /etc/keepalived/keepalived.conf
! Configuration File for keepalived

vrrp_instance VI_1 {
    state BACKUP
    interface eth2
    virtual_router_id 51
    priority 254
    advert_int 1
    authentication {
        auth_type PASS
        auth_pass 1111
    }
    virtual_ipaddress {
        10.12.8.102
    }
}

Test with ping:


[istacey@nfs-server02 ~]$ ping 10.12.8.102
PING 10.12.8.102 (10.12.8.102) 56(84) bytes of data.
From 10.12.8.104 icmp_seq=1 Destination Host Unreachable
From 10.12.8.104 icmp_seq=2 Destination Host Unreachable
From 10.12.8.104 icmp_seq=3 Destination Host Unreachable
From 10.12.8.104 icmp_seq=4 Destination Host Unreachable
^C
--- 10.12.8.102 ping statistics ---
4 packets transmitted, 0 received, +4 errors, 100% packet loss, time 2999ms
pipe 4
[istacey@nfs-server02 ~]$


[istacey@nfs-server01 ~]$ sudo systemctl start  keepalived
[istacey@nfs-server02 ~]$ sudo systemctl start  keepalived

[istacey@nfs-server02 ~]$ ping 10.12.8.102
PING 10.12.8.102 (10.12.8.102) 56(84) bytes of data.
64 bytes from 10.12.8.102: icmp_seq=1 ttl=64 time=0.123 ms
64 bytes from 10.12.8.102: icmp_seq=2 ttl=64 time=0.116 ms
64 bytes from 10.12.8.102: icmp_seq=3 ttl=64 time=0.104 ms

Show VIP:

[istacey@nfs-server01 ~]$ ip --brief a s
lo               UNKNOWN        127.0.0.1/8 ::1/128
eth0             UP             10.12.6.111/25 fe80::5054:ff:fe79:79b3/64
eth1             UP             192.168.112.111/24 fe80::5054:ff:fe06:8dc5/64
eth2             UP             10.12.8.103/28 10.12.8.102/32 fe80::5054:ff:fec6:428f/64
[istacey@nfs-server01 ~]$

Create SFTP chroot jail

Create the sftpusers group and the user on both servers:

[istacey@nfs-server01 ~]$ sudo groupadd -g 15000 nfsrsync
[istacey@nfs-server01 ~]$ sudo groupadd -g 15001 vmnfs1
[istacey@nfs-server01 ~]$ sudo groupadd -g 15002 sftpusers

[istacey@nfs-server01 ~]$ sudo useradd -u 15000 -g nfsrsync nfsrsync
[istacey@nfs-server01 ~]$ sudo useradd -u 15001 -g vmnfs1 vmnfs1

[istacey@nfs-server01 ~]$ sudo usermod -aG sftpusers,nfsrsync vmnfs1

[istacey@nfs-server01 ~]$ sudo mkdir /NFS/vmnfs1
[istacey@nfs-server01 ~]$ sudo mkdir /NFS/vmnfs1/home
[istacey@nfs-server01 ~]$ sudo mkdir /NFS/vmnfs1/home/voucher-management
[istacey@nfs-server01 ~]$ sudo chown vmnfs1:sftpusers /NFS/vmnfs1/home

Note, change permission for the users chrooted “home” directory only. It’s important to leave everything else with the default root permissions.

[istacey@nfs-server01 ~]$ find /NFS -type d -exec ls -ld {} \;
drwxr-xr-x. 3 root root 20 Jul 20 15:52 /NFS
drwxr-xr-x 3 root root 18 Jul 20 15:00 /NFS/vmnfs1
drwxr-xr-x 3 vmnfs1 sftpusers 52 Jul 20 15:16 /NFS/vmnfs1/home
drwxrwxrwx 2 vmnfs1 nfsrsync 59 Jul 20 15:31 /NFS/vmnfs1/home/voucher-management

Update ssh and restart the service:

[istacey@nfs-server01 ~]$ sudo vi /etc/ssh/sshd_config

[istacey@nfs-server01 ~]$ sudo cat  /etc/ssh/sshd_config | grep Subsys -A3
#Subsystem      sftp    /usr/libexec/openssh/sftp-server
Subsystem   sftp    internal-sftp -d /home
Match Group sftpusers
ChrootDirectory /NFS/%u
ForceCommand internal-sftp -d /home/voucher-management

[istacey@nfs-server01 ~]$ sudo  systemctl restart sshd

Note: the ForceCommand option drops the sftp user into a subdirectory

To test first check ssh, this should throw an error:

[istacey@nfs-server02 ~]$ ssh vmnfs1@nfs-server01
vmnfs1@nfs-server01's password:
Last login: Tue Jul 20 15:13:33 2021 from nfs-server02-om.ocs.a1.hr
/bin/bash: No such file or directory
Connection to nfs-server01 closed.
[istacey@nfs-server02 ~]$

OR: 

[istacey@nfs-server02 ~]$ ssh vmnfs1@nfs-server01
vmnfs1@nfs-server01's password:
This service allows sftp connections only.
Connection to nfs-server01 closed.
[istacey@nfs-server02 ~]$

The user can no longer connect via ssh. Let’s try sftp:

[istacey@nfs-server02 ~]$ sftp  vmnfs1@nfs-server01
vmnfs1@nfs-server01's password:
Connected to nfs-server01.
sftp> pwd
Remote working directory: /home/voucher-management
sftp> ls
testfile       testfile1      testfiledate
sftp> quit
[istacey@nfs-server02 ~]$

As required the user is dropped into the /home/voucher-management (/NFS/vmnfs1/home/voucher-management/ on the server).

Finally make sure a regular user can still log in via ssh without the chroot restrictions and we’re done with this part, successfully configuring the sftp server with a jailed chroot user.

Configure rsync

As we are only using local storage and not shared storage, we will synchronize the folders with rsync

On both servers I created a user account called nfsrsync, verified folder owership and permissions, generated and copied ssh keys.

[nfsrsync@nfs-server01 ~]$ ssh-keygen -t rsa
[nfsrsync@nfs-server01 .ssh]$ cp id_rsa.pub authorized_keys

[nfsrsync@nfs-server01 ~]$ ssh-copy-id nfs-server02
[nfsrsync@nfs-server01 .ssh]$ scp id_rsa* nfs-server02:~/.ssh/

Add cron job to run rsync in both directions with a push. I chose not to run rsync as a daemon for this solution

[nfsrsync@nfs-server01 ~]$ crontab -l
*/5 * * * * rsync -rt /NFS/vmnfs1/home/voucher-management/ nfsrsync@nfs-server02:/NFS/vmnfs1/home/voucher-management/

[nfsrsync@nfs-server02 ~]$ crontab -l
*/5 * * * * rsync -rt /NFS/vmnfs1/home/voucher-management/ nfsrsync@nfs-server01:/NFS/vmnfs1/home/voucher-management/
[nfsrsync@nfs-server02 ~]$

Configure NFS

On both servers:

[istacey@nfs-server01 ~]$ sudo vi /etc/exports
[istacey@nfs-server01 ~]$ cat /etc/exports
/NFS/vmnfs1/home/voucher-management     *(rw,no_root_squash)
[istacey@nfs-server01 ~]$ sudo systemctl start nfs-server

Verify with showmount and test mounting the share, from server 2:

[istacey@nfs-server02 ~]$ sudo mount nfs-server01:/NFS/vmnfs1/home/voucher-management  /mnt
[istacey@nfs-server02 ~]$ df -h /mnt
Filesystem                                          Size  Used Avail Use% Mounted on
nfs-server01:/NFS/vmnfs1/home/voucher-management  100G   33M  100G   1% /mnt
[istacey@nfs-server02 ~]$ mount | grep nfs4
nfs-server01:/NFS/vmnfs1/home/voucher-management on /mnt type nfs4 (rw,relatime,vers=4.1,rsize=1048576,wsize=1048576,namlen=255,hard,proto=tcp,timeo=600,retrans=2,sec=sys,clientaddr=10.12.6.112,local_lock=none,addr=10.12.6.111)
[istacey@nfs-server02 ~]$

[istacey@nfs-server02 ~]$ find /mnt
/mnt
/mnt/testfile
/mnt/testfile1
/mnt/testfiledate
[istacey@nfs-server02 ~]$

And we are done.

References

Keepalived: https://www.redhat.com/sysadmin/keepalived-basics

rsync: https://www.atlantic.net/vps-hosting/how-to-use-rsync-copy-sync-files-servers/

chroot jail: https://access.redhat.com/solutions/2399571 , ForceCommand: https://serverfault.com/questions/704869/forward-sftp-user-to-chroot-subdirectory-after-authentication

Categories
Cloud

Updating my WordPress Environment on Amazon EC2

Decoupling my WordPress Architecture:

In a previous post I described the creation of this site in AWS. Now is the time to decouple the infrastructure and remove the reliance on the previously created EC2 instance.

By default WordPress is storing data in two different ways, often locally on the same VM/instances.

  • MySQL database: articles, comments, users and parts of the configuration are stored in a MySQL database, I’m already using an RDS managed MySQL database here to avail of the benefits that brings.
  • File system: media files uploaded are stored on the file system, in my case under /var/www/html/wp-content. This means if the EC2 instance is terminated that data is lost.

The Aim:

  • To create an ephemeral, stateless instance, outsourcing content to S3 and EFS.
  • Create an Auto Scaling group, with a launch template to scale in/out a fleet of instances, in my case, to stick to the free tier, I will set a maximum capacity of 1.
The new infrastructure

EFS: Elastic File System:

Amazon EFS provides scalable file storage for use with Amazon EC2 and I will use it for my wp-content folder. I also have some images stored in S3. Like S3 EFS has resiliency across Availability Zones. With Amazon EFS, you do pay for the resources that you use, but my footprint is very low and I do not expect any charges over a few cents.

To use EFS I:

  • Created a new EFS file system and mounted as /efs/wp-content
  • Copied the contents of /var/www/html/wp-content to the temporary mount
  • Unmounted the EFS and remounted in /var/www/html/wp-content, making the mount persistent by updating /etc/fstab
  • Check the website and the WordPress Update functionality.
My EFS File System

Auto Scaling:

An Auto Scaling group contains a collection of Amazon EC2 instances that are treated as a logical grouping for the purposes of automatic scaling and management. An Auto Scaling group also enables you to use Amazon EC2 Auto Scaling features such as health check replacements and scaling policies.

Here I:

  • Created a new AMI from my original EC2 instance
  • Created a Launch Template (LT) containing the configuration information to launch new instances, including passing specific launch commands in the user data section.
  • Tested new instances by updating the ELB targets
  • After successfully testing, I terminated my previous instances, created a new ASG and updated the ELB targets.
ASG
ASG Settings

Wrap Up:

My environment is much more resilient now with no dependency on a single EC2 instance, high-availability has been introduced at all levels, although to keep to the free tier, my RDS DB instance is not Multi-AZ. Next I’ll tear everything down and redeploy with CloudFormation.

Categories
Cloud Linux

Kubernetes Home Lab (part 1)

Infrastructure:

Ideally I wanted to run a home Kubernetes cluster on three or more Raspberry PIs, but at the time of writing I only have one suitable PI 4 at home and stock appears to be in short supply. Instead I will use what I have, mixing and matching devices.

  • One HP Z200 Workstation with 8GB RAM, running Ubuntu 20.04 with KVM running 2 Ubuntu VMs that I’ll designate as worker nodes in the cluster.
  • 1 Raspberry PI4 Model B 2GB RAM running Ubuntu 20.04 that I’ll use as the Kubernetes Master / Control Plane node.
My makeshift home lab with Stormtrooper on patrol!

Install and Prepare Ubuntu 20.04 on the Z200 / Configure the KVM Hypervisor:

Install Ubuntu on the Z200 Workstation via a bootable USB stick.

Install cpu-checker and verify that the system can use KVM acceleration.

sudo apt install cpu-checker
sudo kvm-ok
The workstation to be used as my hypervisor

Install KVM Packages:

sudo apt install qemu-kvm libvirt-daemon-system libvirt-clients bridge-utils virt-manager virtinst

sudo systemctl status libvirtdsudo 

systemctl enable --now libvirtd

Authorize User and Verify the install:

sudo usermod -aG libvirt $USER
sudo usermod -aG kvm $USER

sudo virsh list --all

Configure Bridged Networking:

Bridged networking allows the virtual interfaces to connect to the outside network through the physical interface, making them appear as normal hosts to the rest of the network. https://help.ubuntu.com/community/KVM/Networking#Bridged_Networking

ip --brief a s
brctl show
nmcli con show
sudo nmtui
NetworkManager TUI

Verify with

ip --brief a s
brctl show
nmcli con show

Configure Private Virtual Switch:

Use virsh to create the private network:

istacey@ubuntu-z200-01:~$ vi /tmp/br0.xml
istacey@ubuntu-z200-01:~$ cat /tmp/br0.xml
<network> 
  <name>br0</name> 
  <forward mode="bridge"/> 
  <bridge name="br0" /> 
</network>
istacey@ubuntu-z200-01:~$ sudo virsh net-list --all
 Name      State    Autostart   Persistent
--------------------------------------------
 default   active   yes         yes

istacey@ubuntu-z200-01:~$ sudo virsh net-define /tmp/br0.xml 
Network br0 defined from /tmp/br0.xml

istacey@ubuntu-z200-01:~$ sudo virsh net-start br0
Network br0 started

istacey@ubuntu-z200-01:~$ sudo virsh net-autostart br0
Network br0 marked as autostarted

istacey@ubuntu-z200-01:~$ sudo virsh net-list --all
 Name      State    Autostart   Persistent
--------------------------------------------
 br0       active   yes         yes
 default   active   yes         yes

istacey@ubuntu-z200-01:~$

Enable incoming ssh:

sudo apt update 
sudo apt install openssh-server
sudo systemctl status ssh

Test KVM

To test KVM, I created a temporary VM via the Virtual Machine Manager GUI (virt-manager), connected to the br0 bridge and used ssh to connect.

Install Vagrant:

KVM is all that is required to create VMs, either manually through the virt-manager GUI or scripted via virt-install, ansible or other automation tool, but for this exercise I thought I’d try Vagrant. I plan to build and rebuild this lab frequently and Vagrant is a popular tool for quickly spinning up VMs. It is not something I’d previously played with, so I thought I’d check it out.

Download and install

Installed as per https://www.vagrantup.com/downloads.

curl -fsSL https://apt.releases.hashicorp.com/gpg | sudo apt-key add -

sudo apt-add-repository "deb [arch=amd64] https://apt.releases.hashicorp.com $(lsb_release -cs) main"
  102  

sudo apt-get update && sudo apt-get install vagrant

vagrant --version

Enable Libvirt provider plugin

We need to install the libvirt provider plugin as Vagrant is only aware Hyper-V, Docker and Oracle Virtualbox by default as shown below.

Default Vagrant Providers

However I hit the following bug when trying to install:

istacey@ubuntu-z200-01:~/vagrant$ vagrant plugin install vagrant-libvirt
Installing the 'vagrant-libvirt' plugin. This can take a few minutes...
Building native extensions. This could take a while...
Vagrant failed to properly resolve required dependencies. These
errors can commonly be caused by misconfigured plugin installations
or transient network issues. The reported error is:

ERROR: Failed to build gem native extension.

....

common.c:27:10: fatal error: st.h: No such file or directory
   27 | #include <st.h>
      |          ^~~~~~
compilation terminated.
make: *** [Makefile:245: common.o] Error 1

make failed, exit code 2

Gem files will remain installed in /home/istacey/.vagrant.d/gems/3.0.1/gems/ruby-libvirt-0.7.1 for inspection.
Results logged to /home/istacey/.vagrant.d/gems/3.0.1/extensions/x86_64-linux/3.0.0/ruby-libvirt-0.7.1/gem_make.out

The bug is described here: https://github.com/hashicorp/vagrant/issues/12445#issuecomment-876254254

After applying the suggested hotfix, I was able to install the plugin and test successfully:

vagrant-libvirt plugin
First Vagrant VM
Vagrant VM and manually provisioned VM running

Create the Worker Node VMs

With KVM working and Vagrant configured we can create the VMs that will become worker nodes in the K8s cluster. Below is my Vagrantfile to spin up two VMs, I referred to https://github.com/vagrant-libvirt/vagrant-libvirt for options:

Vagrant.configure('2') do |config|
  config.vm.box = "generic/ubuntu2004"
  
  config.vm.define :k8swrk01 do |k8swrk01|
    k8swrk01.vm.hostname = "k8s-worker01"
    k8swrk01.vm.network :private_network, type: "dhcp",
      libvirt__network_name: "br0"
    k8swrk01.vm.provider :kvm do |kvm, override|
      kvm.memory_size     = '2048m'
      kvm.cpus            = '2'
    end
  end

  config.vm.define :k8swrk02 do |k8swrk02|
    k8swrk02.vm.hostname = "k8s-worker02"
    k8swrk02.vm.network :private_network, type: "dhcp",
      libvirt__network_name: "br0"
    k8swrk02.vm.provider :kvm do |kvm, override|
      kvm.memory_size     = '2048m'
      kvm.cpus            = '2'
    end
  end

end
Running vagrant up to start the two VMs
VMs running

Install Ubuntu on the Raspberry Pi

Following https://ubuntu.com/tutorials/how-to-install-ubuntu-on-your-raspberry-pi#2-prepare-the-sd-card

Configure nodes

Next configure the nodes, creating user accounts, copying ssh-keys, configuring sudoers, etc.

See part 2 for bootstrapping a new Kubernetes cluster:

Resources

Here are some articles I came across in my research or by complete accident….. …

Tool Homepages

Installation

. https://leftasexercise.com/2020/05/15/managing-kvm-virtual-machines-part-i-vagrant-and-libvirt/ https://www.taniarascia.com/what-are-vagrant-and-virtualbox-and-how-do-i-use-them/ . https://www.hebergementwebs.com/news/how-to-configure-a-kubernetes-cluster-on-ubuntu-20-04-18-04-16-04-in-14-steps . https://ostechnix.com/how-to-use-vagrant-with-libvirt-kvm-provider/