A quick post here as I didn’t find a suitable example online when researching.
The aim is to create multiple CMKs (Customer Managed Keys) in AWS KMS (Key Management Service) with Terraform with unique aliases from a list of variables.
We will also create secrets in AWS Secrets Manager with the newly created CMKs used for the Encryption key. For now the secrets will be created without contents.
Steps below:
Prerequisites:
Install terraform and set environment variables to connect to my AWS account (rather than entering keys in my terraform code.
The key to achieving this aim was the use of count.index in my terraform code to create multiple resources of the same kind, interating through my list of variables.
provider "aws" {
  region = var.aws_region
}

resource "aws_kms_key" "clustername" {
  count       = length(var.clustername) //count will be number of keys
  description = var.clustername[count.index]
}

resource "aws_kms_alias" "clustername-alias" {
  count         = length(var.clustername) //count will be number of key aliases
  name          = "alias/${var.clustername[count.index]}-alias"
  target_key_id = aws_kms_key.clustername[count.index].key_id
}
secrets.tf (note the depends_on field, this ensures the KMS key alias is created before proceeding).
resource "aws_secretsmanager_secret" "app-keystore" {
  depends_on = [aws_kms_alias.clustername-alias]
  count      = length(var.clustername) //count will be number of keys
  name       = "${var.clustername[count.index]}-concat-app-keystore"
  kms_key_id = "alias/${var.clustername[count.index]}-alias"
}
variables.tf:
variable "aws_region" {
  type        = string
  description = "AWS provider to be used to create roles, policies, S3 objects, ..."
}

variable "clustername" {
  type = list(any)
}
./env/eu-west-1.tfvars
# Do not change the order of these default values. it will force the build to destory and rebuild
aws_region          = "eu-west-1"

clustername = [
             "euw1-test-c001",
             "euw1-test-c002",
             "euw1-test-c003",
             "euw1-test-c004",
             ]
output.tf:
output "kms_key_id" {
  value = aws_kms_key.clustername[*].arn
}

output "kms_alias_arn" {
  value = aws_kms_alias.clustername-alias[*].arn
}

output "aws_secretsmanager_secret" {
  value = aws_secretsmanager_secret.app-keystore[*].arn
}
Execution:
Use the terraform commands, init, validate, plan before applying with
terraform apply --var-file=./env/eu-west-1.tfvars
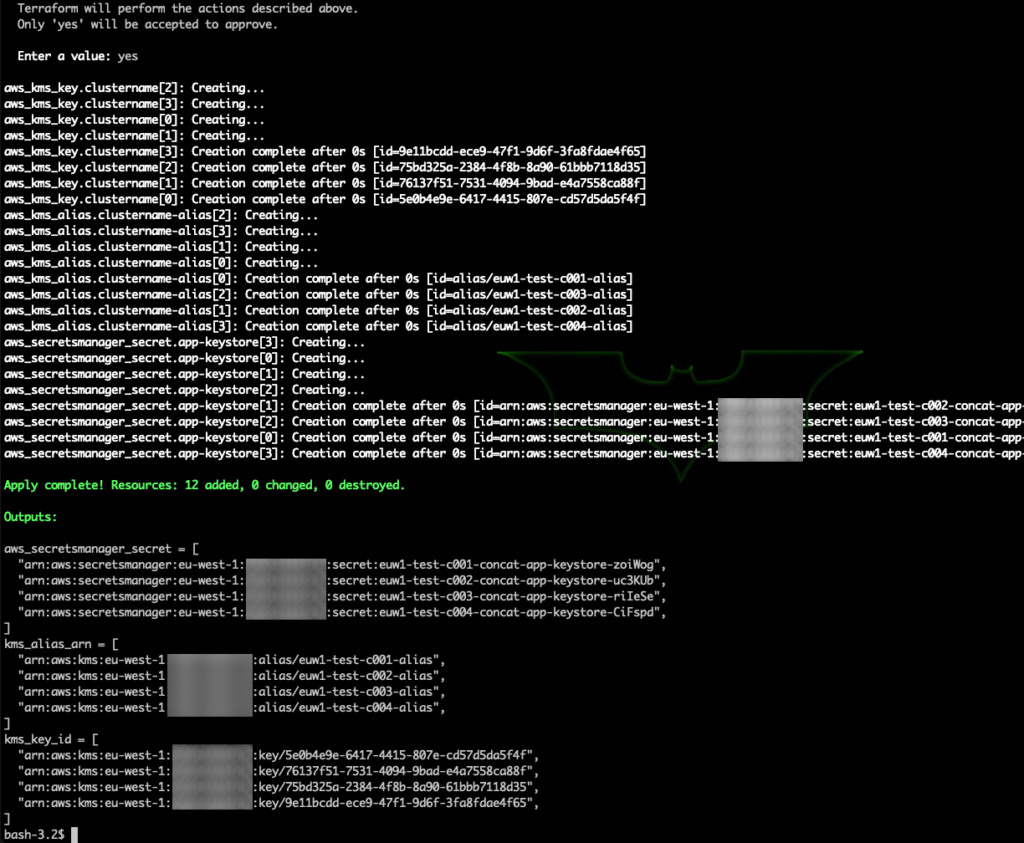
The output of terraform apply below:
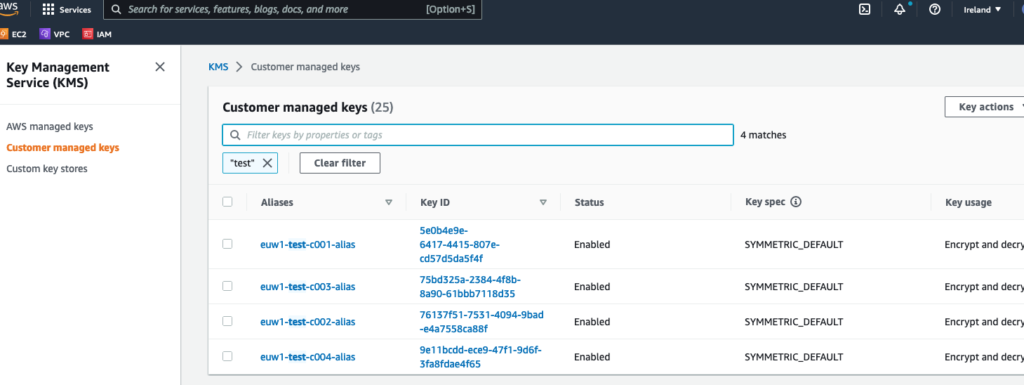
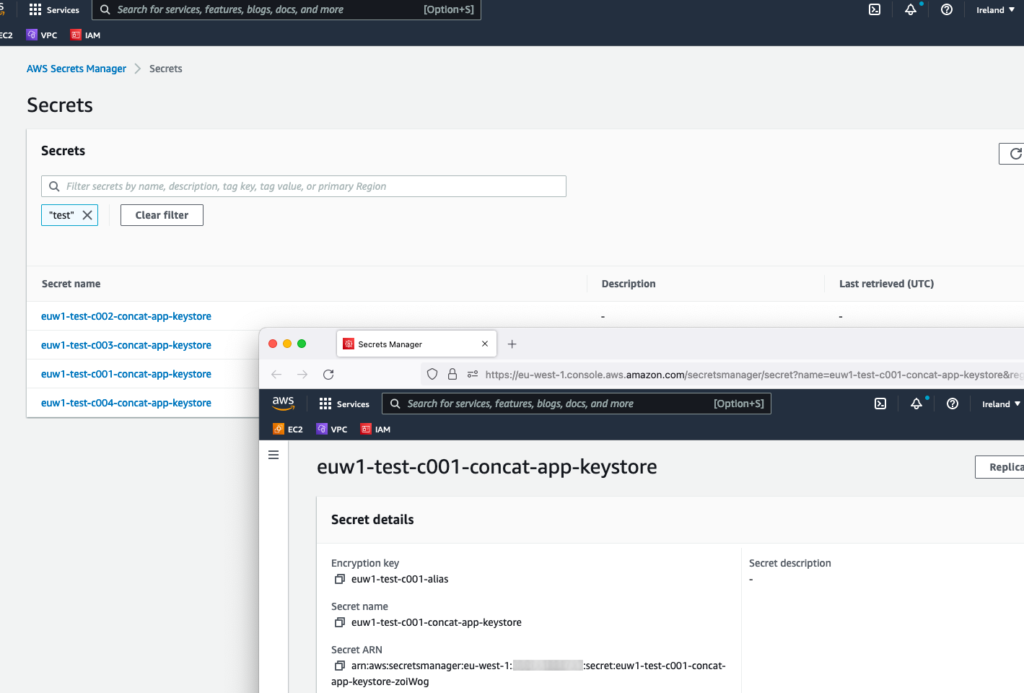
Check via AWS console:
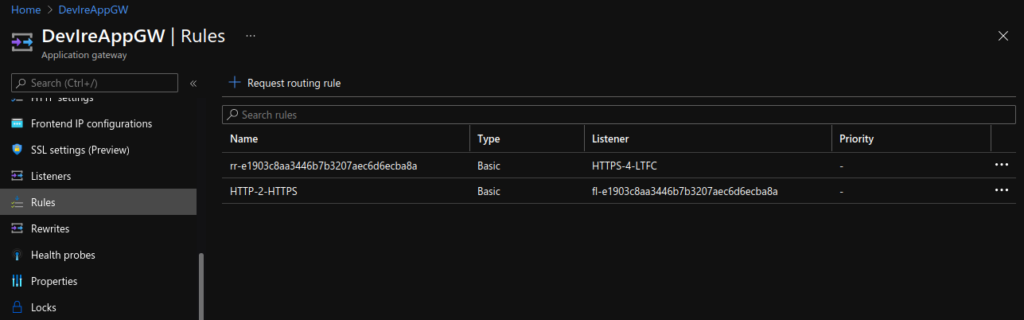
Here we see the keys created, along with the aliases:
And the secrets:
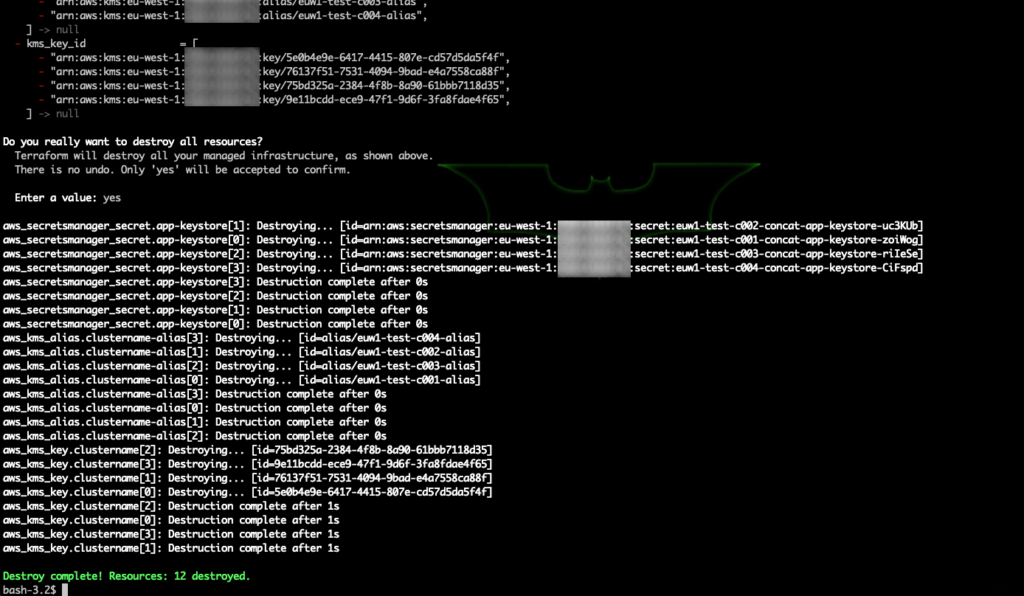
Clean Up:
Run terraform destroy to clean up the resources created:
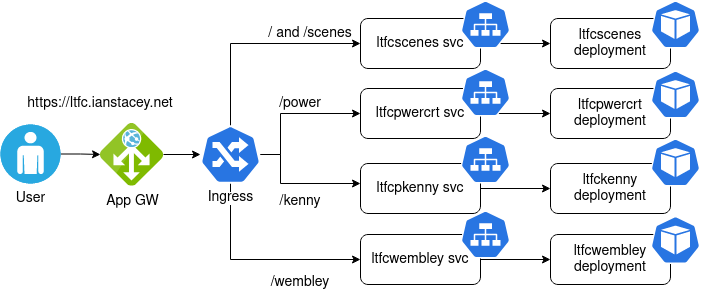
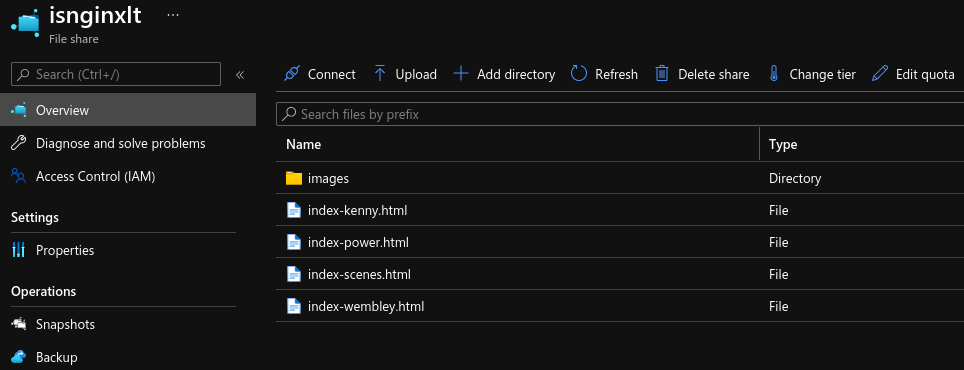
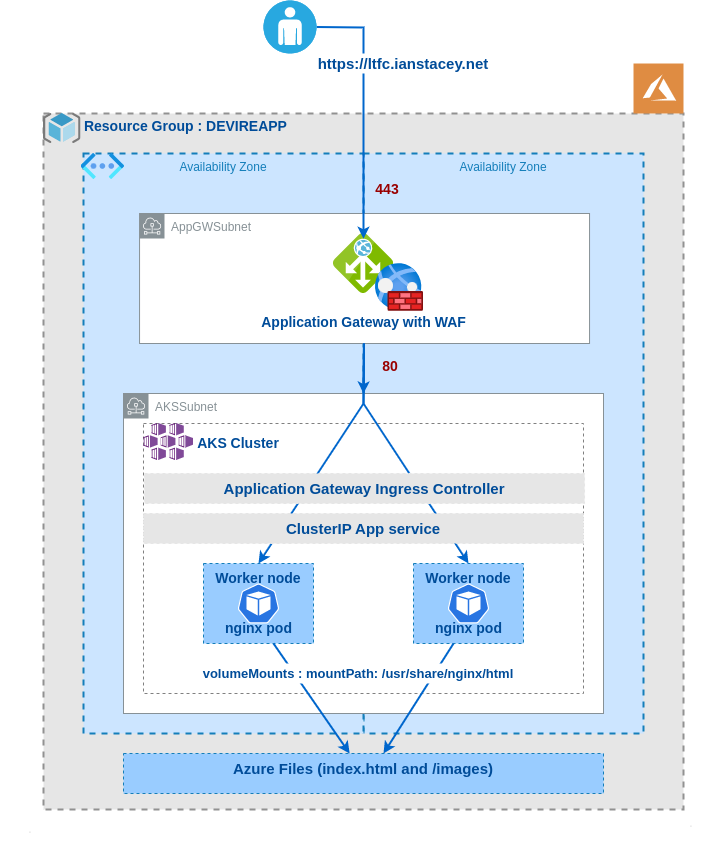
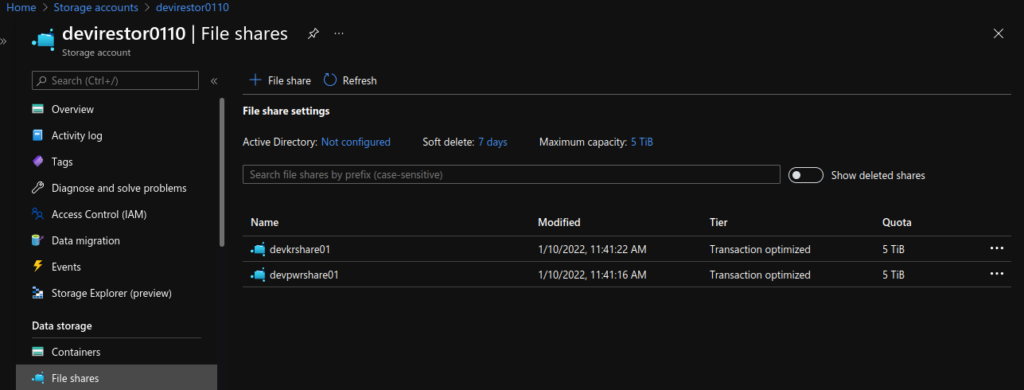
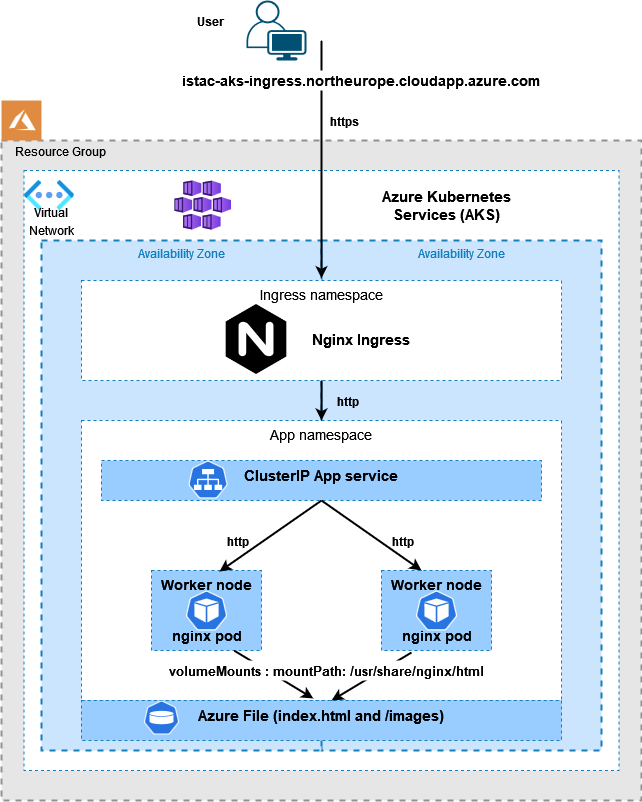
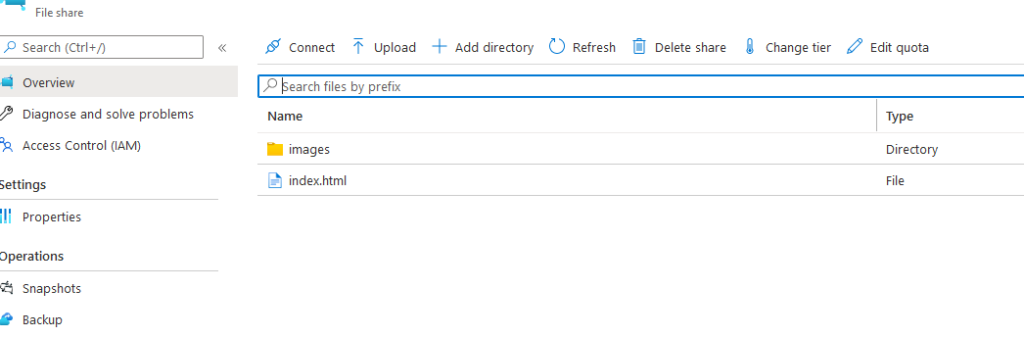
Note the use of subPath in the volumesMounts section, I did this so I would only require one Azure File share, one place to upload the index-*.html and images files.
Created the deployments with kubectl apply -f as below:
Note the annotation of appgw.ingress.kubernetes.io/backend-path-prefix: “/” , this is required as the paths defined above do not exist on the backends, without this annotation we will receive 502 Bad Gateway errors.
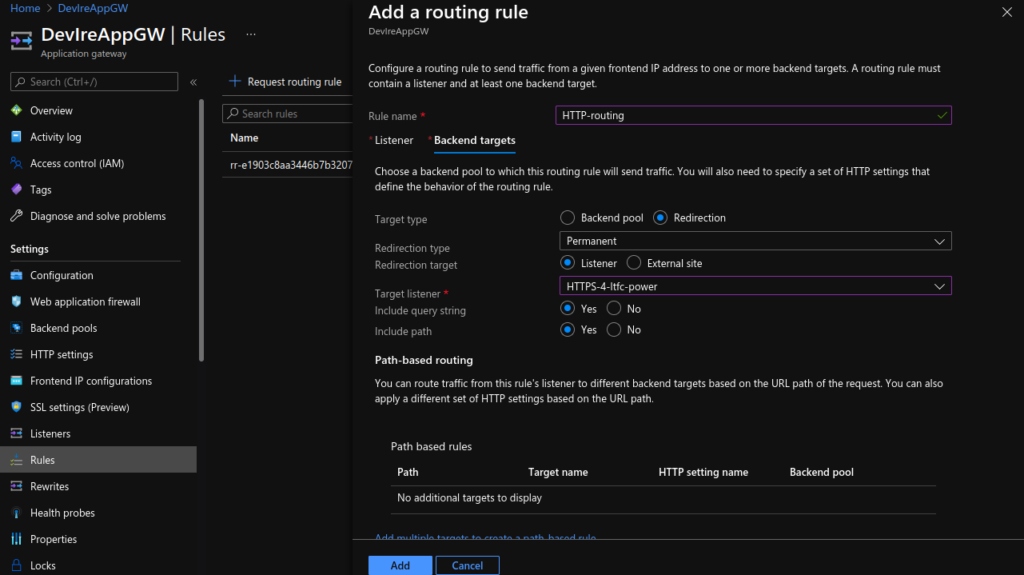
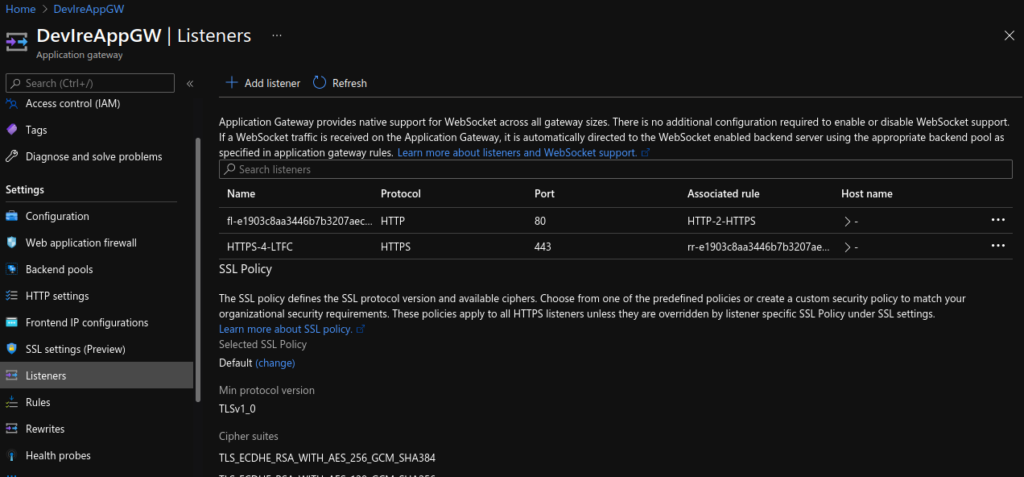
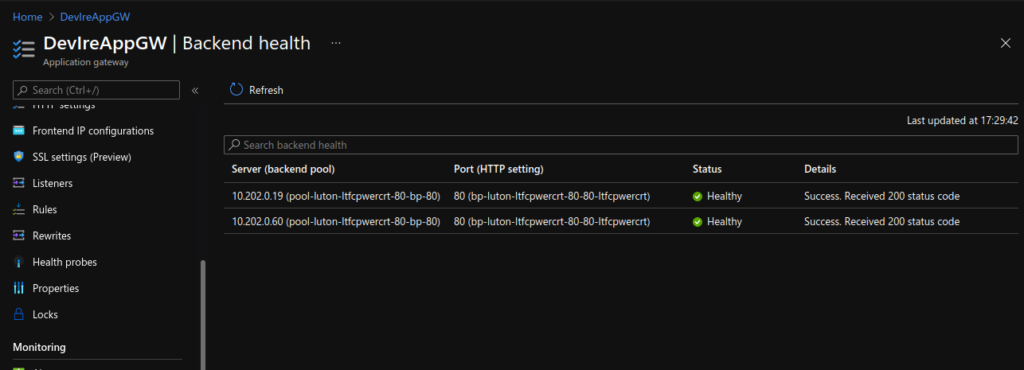
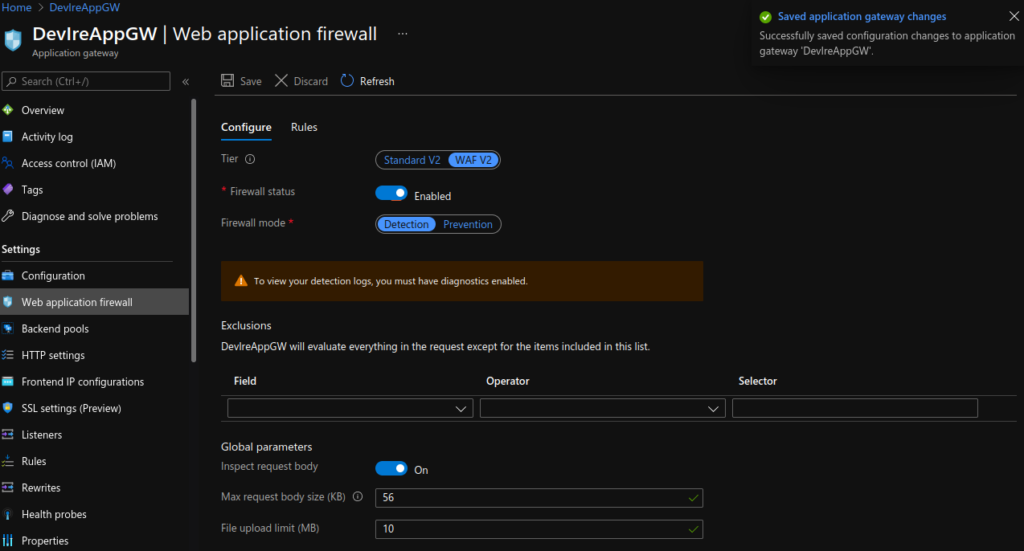
Lastly, I updated the Application Gateway (AGW) via the Azure portal, creating a new HTTPS listeners, uploading my SSL cert, updating the rules and creating a redirect for HTTP to HTTPS. Doing this manually is not ideal as if the ingress is updated (for instance with another apply) these changes will be lost as the ingress automatically updates the AGW.
The kubectl apply command will set up the sample application that uses AGIC for Ingress to the cluster. AGIC will update the Application Gateway created earlier with corresponding routing rules to the new application deployed.
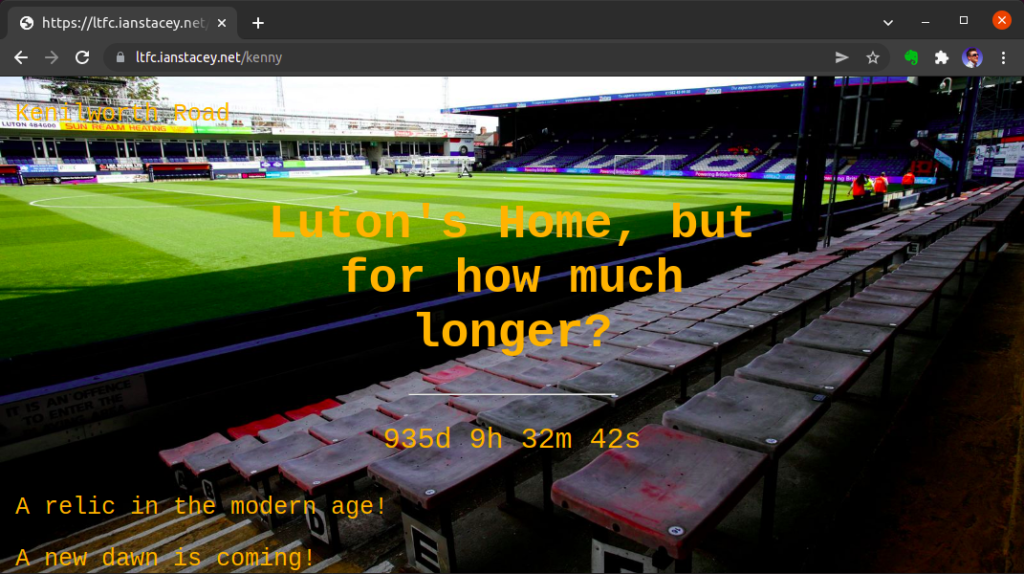
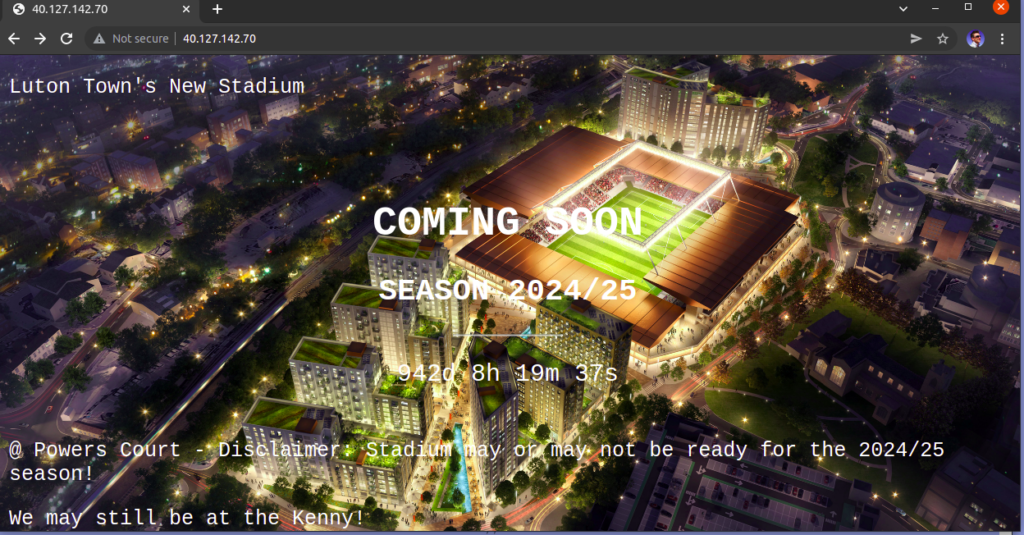
$ kubectl get all -n luton
NAME                               READY   STATUS    RESTARTS   AGE
pod/ltfcpwercrt-6499d886b7-9xb97   1/1     Running   0          25s
pod/ltfcpwercrt-6499d886b7-w4vkz   1/1     Running   0          25s

NAME                  TYPE        CLUSTER-IP     EXTERNAL-IP   PORT(S)   AGE
service/ltfcpwercrt   ClusterIP   10.0.145.174   <none>        80/TCP    26s

NAME                          READY   UP-TO-DATE   AVAILABLE   AGE
deployment.apps/ltfcpwercrt   2/2     2            2           26s

NAME                                     DESIRED   CURRENT   READY   AGE
replicaset.apps/ltfcpwercrt-6499d886b7   2         2         2       26s


$ kubectl get ingress -n luton
NAME          CLASS    HOSTS   ADDRESS         PORTS   AGE
ltfcpwercrt   <none>   *       40.127.142.70   80      33s

$ kubectl get deployment ingress-appgw-deployment -n kube-system
NAME                       READY   UP-TO-DATE   AVAILABLE   AGE
ingress-appgw-deployment   1/1     1            1           7h33m
`This tutorial requires that you’re running the Azure CLI version 2.0.53 or later. Run az –version to find the version.
Use ‘az login’ to log into the Azure account:
az login
The CLI will open your default browser, and load an Azure sign-in page, I have two-factor authentication enabled and need my phone to confirm access.
Create a new Resource Group:
az group create --name AKS4BIM02 --location northeurope
Create an Azure Container Registry:
I will not use this initially, but I will create for future use.
az acr create --resource-group AKS4BIM02 --name acr4BIM --sku Basic

## List images in registry (None yet)

az acr repository list --name acr4BIM --output table
$ kubectl create -f nginx-deployment.yaml
deployment.apps/isnginx-deployment created

$ kubectl rollout status deployment isnginx-deployment -n isnginx
Waiting for deployment "isnginx-deployment" rollout to finish: 0 of 2 updated replicas are available...

$ kubectl -n isnginx describe pod isnginx-deployment-5ff78ff678-7dphq  | tail -5
  Type     Reason       Age                  From               Message
  ----     ------       ----                 ----               -------
  Normal   Scheduled    2m32s                default-scheduler  Successfully assigned isnginx/isnginx-deployment-5ff78ff678-7dphq to aks-nodepool1-88432225-vmss000000
  Warning  FailedMount  29s                  kubelet            Unable to attach or mount volumes: unmounted volumes=[nginxtest01], unattached volumes=[default-token-lh6xf nginxtest01]: timed out waiting for the condition
  Warning  FailedMount  24s (x9 over 2m32s)  kubelet            MountVolume.SetUp failed for volume "aksshare4bim02" : Couldn't get secret isnginx/azure-secret
Mount failing as secret created in the default namespace.
$ kubectl -n isnginx get secret
NAME                  TYPE                                  DATA   AGE
azure-secret          Opaque                                2      97m
default-token-lh6xf   kubernetes.io/service-account-token   3      104m
Remove the deployment and recreate:
$ kubectl delete -f nginx-deployment.yaml
deployment.apps "isnginx-deployment" deleted

$ kubectl create -f nginx-deployment.yaml
deployment.apps/isnginx-deployment created

$ kubectl rollout status deployment isnginx-deployment -n isnginx
Waiting for deployment "isnginx-deployment" rollout to finish: 0 of 2 updated replicas are available...
Waiting for deployment "isnginx-deployment" rollout to finish: 1 of 2 updated replicas are available...
deployment "isnginx-deployment" successfully rolled out
$ kubectl -n isnginx get all
NAME                                      READY   STATUS    RESTARTS   AGE
pod/isnginx-deployment-6b8d9db99c-2kj5l   1/1     Running   0          80s
pod/isnginx-deployment-6b8d9db99c-w65gp   1/1     Running   0          80s

NAME                                 READY   UP-TO-DATE   AVAILABLE   AGE
deployment.apps/isnginx-deployment   2/2     2            2           80s

NAME                                            DESIRED   CURRENT   READY   AGE
replicaset.apps/isnginx-deployment-6b8d9db99c   2         2         2       80s
Create service / Expose deployment
And get external IP:
$ kubectl -n isnginx expose deployment isnginx-deployment --port=80 --type=LoadBalancer
service/isnginx-deployment exposed

$ kubectl -n isnginx get svc
NAME                 TYPE           CLUSTER-IP    EXTERNAL-IP    PORT(S)        AGE
isnginx-deployment   LoadBalancer   10.0.110.58   20.93.54.110   80:30451/TCP   95m
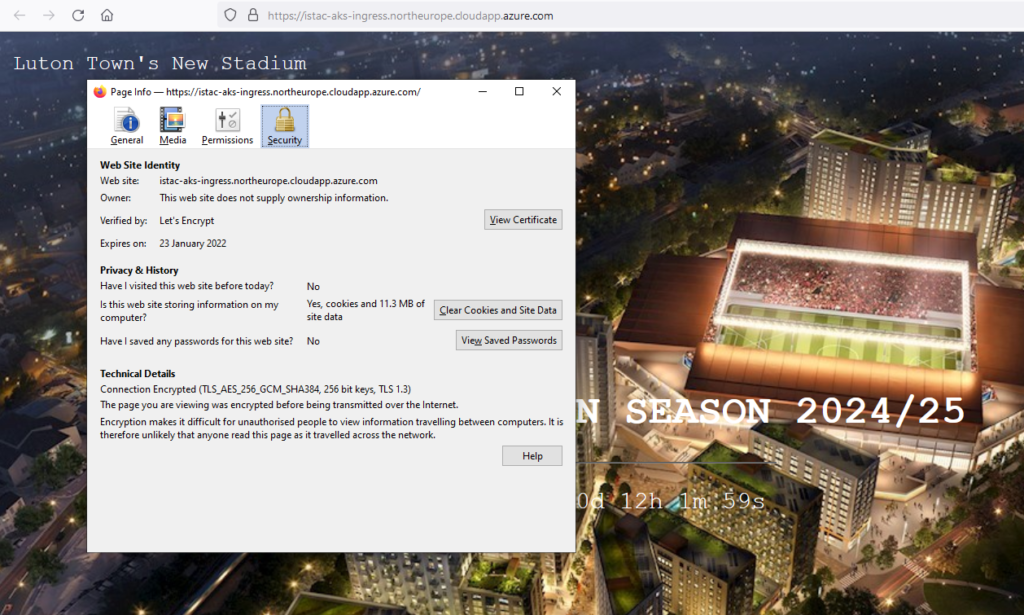
Test with curl and web browser:
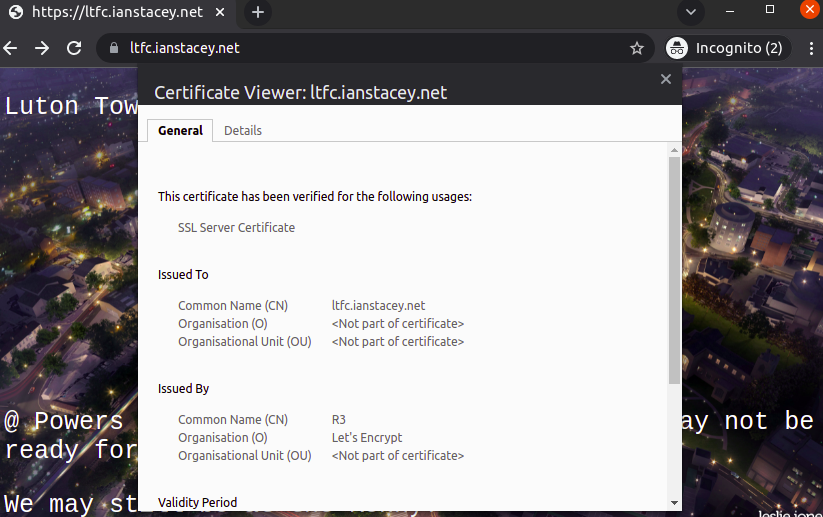
$ curl http://20.93.54.110 | grep -i luton
  % Total    % Received % Xferd  Average Speed   Time    Time     Time  Current
                                 Dload  Upload   Total   Spent    Left  Speed
100  2139  100  2139    0     0  44562      0 --:--:-- --:--:-- --:--:-- 45510
    <p>Luton Town's New Stadium</p>
$ kubectl -n ingress-nginx get all
NAME                                            READY   STATUS      RESTARTS   AGE
pod/ingress-nginx-admission-create-twnd7        0/1     Completed   0          8m3s
pod/ingress-nginx-admission-patch-vnsj4         0/1     Completed   1          8m3s
pod/ingress-nginx-controller-5d4b6f79c4-mknxc   1/1     Running     0          8m4s

NAME                                         TYPE           CLUSTER-IP   EXTERNAL-IP     PORT(S)                      AGE
service/ingress-nginx-controller             LoadBalancer   10.0.77.11   20.105.96.112   80:31078/TCP,443:31889/TCP   8m4s
service/ingress-nginx-controller-admission   ClusterIP      10.0.2.37    <none>          443/TCP                      8m4s

NAME                                       READY   UP-TO-DATE   AVAILABLE   AGE
deployment.apps/ingress-nginx-controller   1/1     1            1           8m4s

NAME                                                  DESIRED   CURRENT   READY   AGE
replicaset.apps/ingress-nginx-controller-5d4b6f79c4   1         1         1       8m4s

NAME                                       COMPLETIONS   DURATION   AGE
job.batch/ingress-nginx-admission-create   1/1           1s         8m3s
job.batch/ingress-nginx-admission-patch    1/1           3s         8m3s
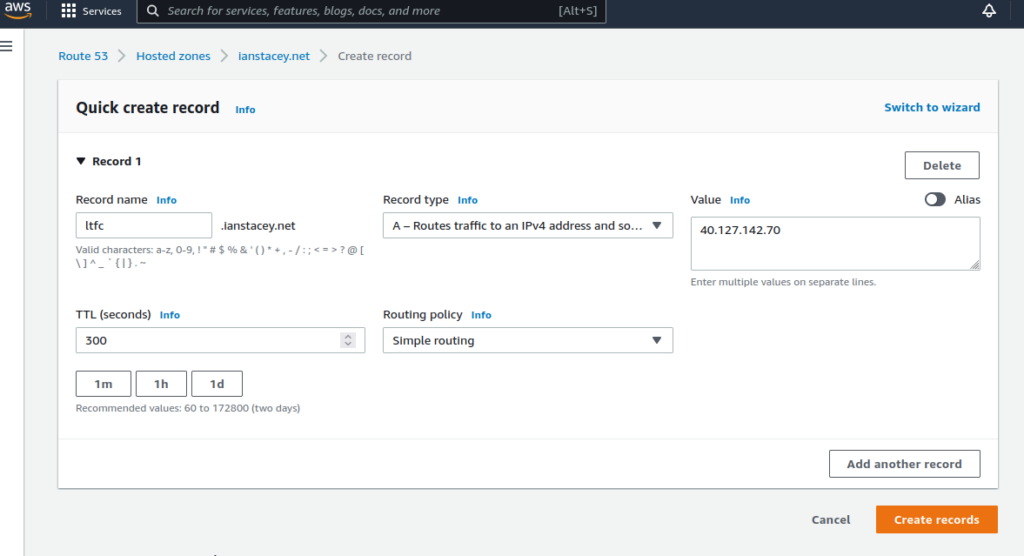
Add an A record to DNS zone
$ IP=20.105.96.112
$ DNSNAME="istac-aks-ingress"
$ PUBLICIPID=$(az network public-ip list --query "[?ipAddress!=null]|[?contains(ipAddress, '$IP')].[id]" --output tsv)
$ az network public-ip update --ids $PUBLICIPID --dns-name $DNSNAME

$ az network public-ip show --ids $PUBLICIPID --query "[dnsSettings.fqdn]" --output tsv
istac-aks-ingress.northeurope.cloudapp.azure.com

$ az network public-ip show --ids $PUBLICIPID --query "[dnsSettings.fqdn]" --output tsv | nslookup
Server:         89.101.160.4
Address:        89.101.160.4#53

Non-authoritative answer:
Name:   istac-aks-ingress.northeurope.cloudapp.azure.com
Address: 20.105.96.112
Install cert-manager with helm:
$ kubectl label namespace ingress-nginx cert-manager.io/disable-validation=true
namespace/ingress-nginx labeled

$ helm repo add jetstack https://charts.jetstack.io
"jetstack" has been added to your repositories

$ helm repo update
Hang tight while we grab the latest from your chart repositories...
...Successfully got an update from the "ingress-nginx" chart repository
...Successfully got an update from the "jetstack" chart repository
Update Complete. ⎈Happy Helming!⎈
$ helm install cert-manager jetstack/cert-manager \
>   --namespace ingress-nginx \
> --set installCRDs=true \
> --set nodeSelector."kubernetes\.io/os"=linux

NAME: cert-manager
LAST DEPLOYED: Mon Oct 25 10:56:51 2021
NAMESPACE: ingress-nginx
STATUS: deployed
REVISION: 1
TEST SUITE: None
NOTES:
cert-manager v1.5.4 has been deployed successfully!
$ kubectl -n ingress-nginx get all
NAME                                            READY   STATUS      RESTARTS   AGE
pod/cert-manager-88ddc7f8d-ltz9z                1/1     Running     0          158m
pod/cert-manager-cainjector-748dc889c5-kcdx7    1/1     Running     0          158m
pod/cert-manager-webhook-55dfcc5474-tbrz2       1/1     Running     0          158m
pod/ingress-nginx-admission-create-twnd7        0/1     Completed   0          3h45m
pod/ingress-nginx-admission-patch-vnsj4         0/1     Completed   1          3h45m
pod/ingress-nginx-controller-5d4b6f79c4-mknxc   1/1     Running     0          3h45m

NAME                                         TYPE           CLUSTER-IP     EXTERNAL-IP     PORT(S)                      AGE
service/cert-manager                         ClusterIP      10.0.7.50      <none>          9402/TCP                     158m
service/cert-manager-webhook                 ClusterIP      10.0.132.151   <none>          443/TCP                      158m
service/ingress-nginx-controller             LoadBalancer   10.0.77.11     20.105.96.112   80:31078/TCP,443:31889/TCP   3h45m
service/ingress-nginx-controller-admission   ClusterIP      10.0.2.37      <none>          443/TCP                      3h45m

NAME                                       READY   UP-TO-DATE   AVAILABLE   AGE
deployment.apps/cert-manager               1/1     1            1           158m
deployment.apps/cert-manager-cainjector    1/1     1            1           158m
deployment.apps/cert-manager-webhook       1/1     1            1           158m
deployment.apps/ingress-nginx-controller   1/1     1            1           3h45m

NAME                                                  DESIRED   CURRENT   READY   AGE
replicaset.apps/cert-manager-88ddc7f8d                1         1         1       158m
replicaset.apps/cert-manager-cainjector-748dc889c5    1         1         1       158m
replicaset.apps/cert-manager-webhook-55dfcc5474       1         1         1       158m
replicaset.apps/ingress-nginx-controller-5d4b6f79c4   1         1         1       3h45m

NAME                                       COMPLETIONS   DURATION   AGE
job.batch/ingress-nginx-admission-create   1/1           1s         3h45m
job.batch/ingress-nginx-admission-patch    1/1           3s         3h45m
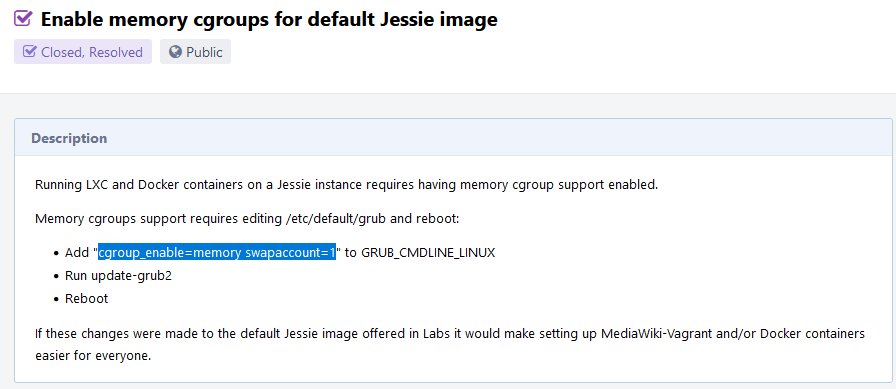
My first attempt failed due to a cgroups_memory issue:
root@k8s-master01:~# kubeadm init --pod-network-cidr=10.244.0.0/16 --apiserver-advertise-address=192.168.0.185
[init] Using Kubernetes version: v1.22.2
[preflight] Running pre-flight checks
[preflight] The system verification failed. Printing the output from the verification:
root@k8s-master01:~# docker info | head
Client:
Context:    default
Debug Mode: false
Plugins:
  app: Docker App (Docker Inc., v0.9.1-beta3)
  buildx: Build with BuildKit (Docker Inc., v0.5.1-docker)

Server:
Containers: 2
  Running: 0
root@k8s-master01:~# docker info | grep -i cgroup
Cgroup Driver: systemd
Cgroup Version: 1
WARNING: No memory limit support
WARNING: No swap limit support
WARNING: No kernel memory TCP limit support
WARNING: No oom kill disable support
root@k8s-master01:~# kubeadm init --pod-network-cidr=10.244.0.0/16 --apiserver-advertise-address=192.168.0.185
[init] Using Kubernetes version: v1.22.2
[preflight] Running pre-flight checks
[WARNING SystemVerification]: missing optional cgroups: hugetlb
[preflight] Pulling images required for setting up a Kubernetes cluster
[preflight] This might take a minute or two, depending on the speed of your internet connection
[preflight] You can also perform this action in beforehand using 'kubeadm config images pull'
[certs] Using certificateDir folder "/etc/kubernetes/pki"
[certs] Generating "ca" certificate and key
[certs] Generating "apiserver" certificate and key
[certs] apiserver serving cert is signed for DNS names [k8s-master01 kubernetes kubernetes.default kubernetes.default.svc kubernetes.default.svc.cluster.local] and IPs [10.96.0.1 192.168.0.185]
[certs] Generating "apiserver-kubelet-client" certificate and key
[certs] Generating "front-proxy-ca" certificate and key
[certs] Generating "front-proxy-client" certificate and key
[certs] Generating "etcd/ca" certificate and key
[certs] Generating "etcd/server" certificate and key
[certs] etcd/server serving cert is signed for DNS names [k8s-master01 localhost] and IPs [192.168.0.185 127.0.0.1 ::1]
[certs] Generating "etcd/peer" certificate and key
[certs] etcd/peer serving cert is signed for DNS names [k8s-master01 localhost] and IPs [192.168.0.185 127.0.0.1 ::1]
[certs] Generating "etcd/healthcheck-client" certificate and key
[certs] Generating "apiserver-etcd-client" certificate and key
[certs] Generating "sa" key and public key
[kubeconfig] Using kubeconfig folder "/etc/kubernetes"
[kubeconfig] Writing "admin.conf" kubeconfig file
[kubeconfig] Writing "kubelet.conf" kubeconfig file
[kubeconfig] Writing "controller-manager.conf" kubeconfig file
[kubeconfig] Writing "scheduler.conf" kubeconfig file
[kubelet-start] Writing kubelet environment file with flags to file "/var/lib/kubelet/kubeadm-flags.env"
[kubelet-start] Writing kubelet configuration to file "/var/lib/kubelet/config.yaml"
[kubelet-start] Starting the kubelet
[control-plane] Using manifest folder "/etc/kubernetes/manifests"
[control-plane] Creating static Pod manifest for "kube-apiserver"
[control-plane] Creating static Pod manifest for "kube-controller-manager"
[control-plane] Creating static Pod manifest for "kube-scheduler"
[etcd] Creating static Pod manifest for local etcd in "/etc/kubernetes/manifests"
[wait-control-plane] Waiting for the kubelet to boot up the control plane as static Pods from directory "/etc/kubernetes/manifests". This can take up to 4m0s
[apiclient] All control plane components are healthy after 28.511339 seconds
[upload-config] Storing the configuration used in ConfigMap "kubeadm-config" in the "kube-system" Namespace
[kubelet] Creating a ConfigMap "kubelet-config-1.22" in namespace kube-system with the configuration for the kubelets in the cluster
[upload-certs] Skipping phase. Please see --upload-certs
[mark-control-plane] Marking the node k8s-master01 as control-plane by adding the labels: [node-role.kubernetes.io/master(deprecated) node-role.kubernetes.io/control-plane node.kubernetes.io/exclude-from-external-load-balancers]
[mark-control-plane] Marking the node k8s-master01 as control-plane by adding the taints [node-role.kubernetes.io/master:NoSchedule]
[bootstrap-token] Using token: oq7hb9.vtmiw210ozvi2grh
[bootstrap-token] Configuring bootstrap tokens, cluster-info ConfigMap, RBAC Roles
[bootstrap-token] configured RBAC rules to allow Node Bootstrap tokens to get nodes
[bootstrap-token] configured RBAC rules to allow Node Bootstrap tokens to post CSRs in order for nodes to get long term certificate credentials
[bootstrap-token] configured RBAC rules to allow the csrapprover controller automatically approve CSRs from a Node Bootstrap Token
[bootstrap-token] configured RBAC rules to allow certificate rotation for all node client certificates in the cluster
[bootstrap-token] Creating the "cluster-info" ConfigMap in the "kube-public" namespace
[kubelet-finalize] Updating "/etc/kubernetes/kubelet.conf" to point to a rotatable kubelet client certificate and key
[addons] Applied essential addon: CoreDNS
[addons] Applied essential addon: kube-proxy
Your Kubernetes control-plane has initialized successfully!
To start using your cluster, you need to run the following as a regular user:
mkdir -p $HOME/.kube
sudo cp -i /etc/kubernetes/admin.conf $HOME/.kube/config
sudo chown $(id -u):$(id -g) $HOME/.kube/config
Alternatively, if you are the root user, you can run:
export KUBECONFIG=/etc/kubernetes/admin.conf
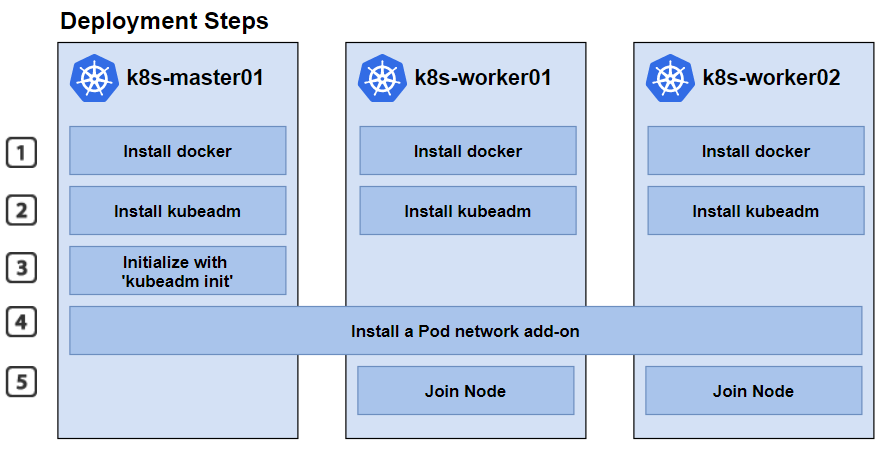
You should now deploy a pod network to the cluster.
Run "kubectl apply -f [podnetwork].yaml" with one of the options listed at:
https://kubernetes.io/docs/concepts/cluster-administration/addons/
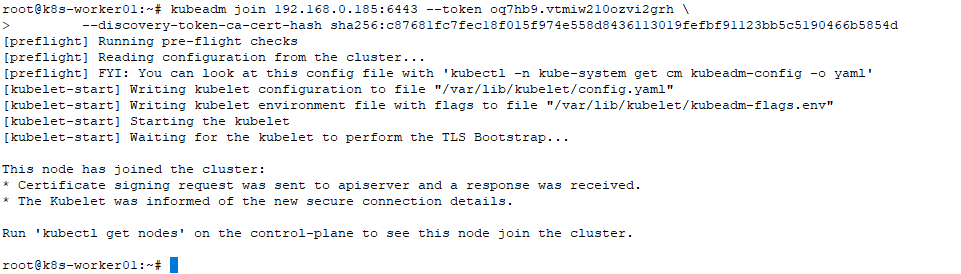
Then you can join any number of worker nodes by running the following on each as root:
kubeadm join 192.168.0.185:6443 --token oq7hb9.vtmiw210ozvi2grh \
--discovery-token-ca-cert-hash sha256:c87681fc7fec18f015f974e558d8436113019fefbf91123bb5c5190466b5854d
root@k8s-master01:~#
istacey@k8s-master01:~$ kubectl apply -f "https://cloud.weave.works/k8s/net?k8s-version=$(kubectl version | base64 | tr -d '\n')"
serviceaccount/weave-net created
clusterrole.rbac.authorization.k8s.io/weave-net created
clusterrolebinding.rbac.authorization.k8s.io/weave-net created
role.rbac.authorization.k8s.io/weave-net created
rolebinding.rbac.authorization.k8s.io/weave-net created
daemonset.apps/weave-net created
istacey@k8s-master01:~$
Check Nodes are ready and pods running:
istacey@k8s-master01:~$ kubectl get nodes
NAME           STATUS   ROLES                  AGE   VERSION
k8s-master01   Ready    control-plane,master   13m   v1.22.2

istacey@k8s-master01:~$ kubectl get pods -A
NAMESPACE     NAME                                   READY   STATUS    RESTARTS      AGE
kube-system   coredns-78fcd69978-cnql6               1/1     Running   0             14m
kube-system   coredns-78fcd69978-k4bnk               1/1     Running   0             14m
kube-system   etcd-k8s-master01                      1/1     Running   0             14m
kube-system   kube-apiserver-k8s-master01            1/1     Running   0             14m
kube-system   kube-controller-manager-k8s-master01   1/1     Running   0             14m
kube-system   kube-proxy-lx8bj                       1/1     Running   0             14m
kube-system   kube-scheduler-k8s-master01            1/1     Running   0             14m
kube-system   weave-net-f7f7h                        2/2     Running   1 (99s ago)   2m2s
istacey@k8s-master01:~$ kubectl get nodes
NAME           STATUS   ROLES                  AGE    VERSION
k8s-master01   Ready    control-plane,master   18m    v1.22.2
k8s-worker01   Ready    <none>                 2m4s   v1.22.2
k8s-worker02   Ready    <none>                 51s    v1.22.2

istacey@k8s-master01:~$ kubectl get ds -n kube-system
NAME         DESIRED   CURRENT   READY   UP-TO-DATE   AVAILABLE   NODE SELECTOR            AGE
kube-proxy   3         3         3       3            3           kubernetes.io/os=linux   18m
weave-net    3         3         3       3            3           <none>                   6m10s
Quick Test:
istacey@k8s-master01:~$ kubectl run nginx --image=nginx
pod/nginx created
istacey@k8s-master01:~$ kubectl get pods -o wide
NAME    READY   STATUS              RESTARTS   AGE   IP       NODE           NOMINATED NODE   READINESS GATES
nginx   0/1     ContainerCreating   0          23s   <none>   k8s-worker01   <none>           <none>
istacey@k8s-master01:~$ kubectl get pods -o wide
NAME    READY   STATUS    RESTARTS   AGE   IP          NODE           NOMINATED NODE   READINESS GATES
nginx   1/1     Running   0          27s   10.44.0.1   k8s-worker01   <none>           <none>

istacey@k8s-master01:~$ kubectl delete po nginx
pod "nginx" deleted
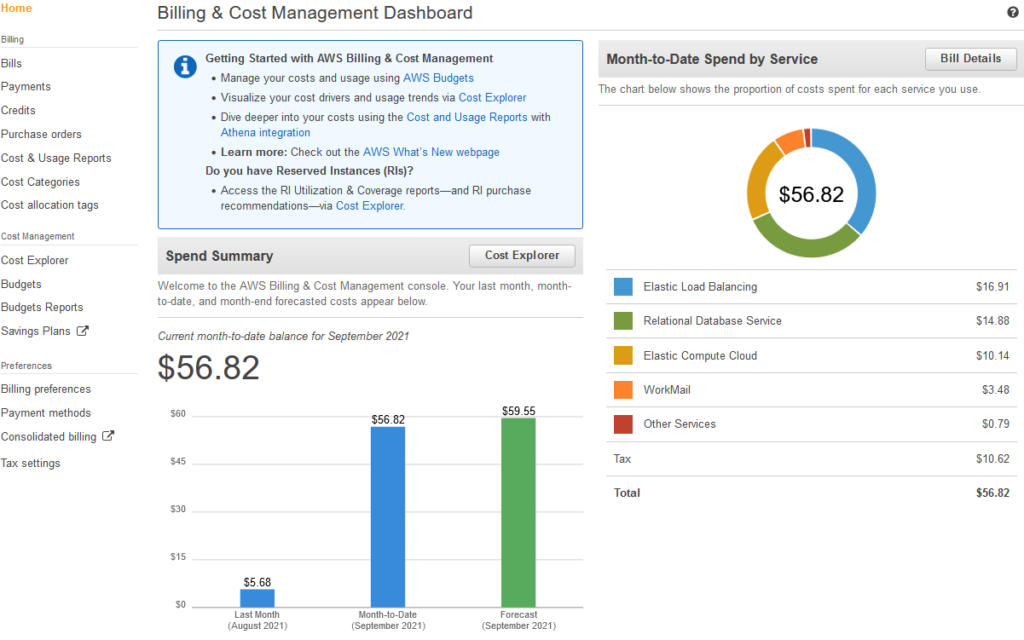
As per the title my 12 months free tier usage for this AWS account has expired. As this website would cost me around $60 per month, I decided to migrate to AWS Lightsail, with prices starting at a more attractive $3.50 per month. Thankfully I had billing alerts configured to warn me on the increased spend.
The process to migrate was simple enough following the online instructions, first exporting my current site, deploying a new WordPress Bitnami image on Amazon Lightsail and then importing.
I had some configuration to do in terms of the site, enabling HTTPS, assigning a free static IP and updating Route 53.
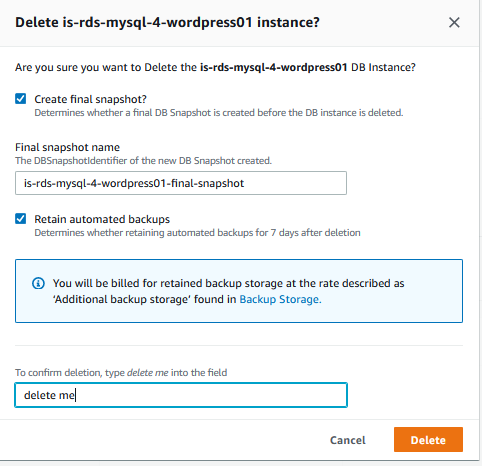
Once I was happy with the migration, I took final backups from the old architecture including a final snapshot of the RDS database instance before deleting the resources.
4 worker nodes with 25GB raw disk used in a ceph block cluster. As we are running low on space, we will extend the raw disks to 50GB and update rook-ceph accordingly.
Ceph OSD Management
Ceph Object Storage Daemons (OSDs) are the heart and soul of the Ceph storage platform. Each OSD manages a local device and together they provide the distributed storage. Rook will automate creation and management of OSDs to hide the complexity based on the desired state in the CephCluster CR as much as possible. This guide will walk through some of the scenarios to configure OSDs where more configuration may be required.
OSD Health
The rook-ceph-tools pod provides a simple environment to run Ceph tools. The ceph commands mentioned in this document should be run from the toolbox.
Once the is created, connect to the pod to execute the ceph commands to analyze the health of the cluster, in particular the OSDs and placement groups (PGs). Some common commands to analyze OSDs include:
ceph status
ceph osd tree
ceph osd status
ceph osd df
ceph osd utilization

kubectl -n rook-ceph exec -it $(kubectl -n rook-ceph get pod -l "app=rook-ceph-tools" -o jsonpath='{.items[0].metadata.name}') bash
To remove an OSD due to a failed disk or other re-configuration, consider the following to ensure the health of the data through the removal process:
Confirm you will have enough space on your cluster after removing your OSDs to properly handle the deletion
Confirm the remaining OSDs and their placement groups (PGs) are healthy in order to handle the rebalancing of the data
Do not remove too many OSDs at once
Wait for rebalancing between removing multiple OSDs
If all the PGs are active+clean and there are no warnings about being low on space, this means the data is fully replicated and it is safe to proceed. If an OSD is failing, the PGs will not be perfectly clean and you will need to proceed anyway.
Scale down rook-ceph-operator and the OSD deployments:
As root clean and Prepare the disk on the VM:

DISK="/dev/sdb"
dd if=/dev/zero of="$DISK" bs=1M count=100 oflag=direct,dsync
ls /dev/mapper/ceph-* | xargs -I% -- dmsetup remove %
rm -rf /dev/ceph-*
rm -rf /dev/mapper/ceph--*
partprobe $DISK


[root@worker002 ~]# lsblk

NAME                MAJ:MIN RM  SIZE RO TYPE MOUNTPOINT
sdb                   8:16   0   50G  0 disk
[istacey@master001 ~]$ kubectl -n rook-ceph exec -it rook-ceph-tools-5d9d5db5bc-npz4r  -- ceph status
  cluster:
    id:     13c5138f-f2f6-46ea-8ee0-4966330ac081
    health: HEALTH_OK

  services:
    mon: 3 daemons, quorum a,b,c (age 14h)
    mgr: a(active, since 14h)
    osd: 4 osds: 4 up (since 32m), 4 in (since 32m)

  task status:

  data:
    pools:   2 pools, 129 pgs
    objects: 5.12k objects, 19 GiB
    usage:   63 GiB used, 62 GiB / 125 GiB avail
    pgs:     129 active+clean

  io:
    client:   73 KiB/s wr, 0 op/s rd, 2 op/s wr

[istacey@master001 ~]$ kubectl -n rook-ceph exec -it rook-ceph-tools-5d9d5db5bc-npz4r -- ceph df
--- RAW STORAGE ---
CLASS  SIZE     AVAIL   USED    RAW USED  %RAW USED
hdd    125 GiB  62 GiB  59 GiB    63 GiB      50.14
TOTAL  125 GiB  62 GiB  59 GiB    63 GiB      50.14

--- POOLS ---
POOL                   ID  PGS  STORED  OBJECTS  USED    %USED  MAX AVAIL
device_health_metrics   1    1     0 B        0     0 B      0     15 GiB
replicapool             3  128  19 GiB    5.12k  58 GiB  55.89     15 GiB

[istacey@master001 ~]$ kubectl -n rook-ceph exec -it rook-ceph-tools-5d9d5db5bc-npz4r  -- ceph osd status
ID  HOST        USED  AVAIL  WR OPS  WR DATA  RD OPS  RD DATA  STATE
 0  worker002  20.5G  29.4G      1      156k      0        0   exists,up
 1  worker003  13.2G  11.7G      0        0       0        0   exists,up
 2  worker004  14.3G  10.6G      0        0       0        0   exists,up
 3  worker001  14.5G  10.4G      0     4095       0        0   exists,up
Repeat for next 3 OSDs…
The operator ideally will automatically create the new OSD within a few minutes of adding the new device or updating the CR. If you don’t see a new OSD automatically created, restart the operator (by deleting the operator pod) to trigger the OSD creation.
Extra step after hitting an issue:
Pod in error and storage not available on node, edit with kubectl after scaling operations
### Edit with kubectl and remove node:

kubectl edit CephCluster rook-ceph -n rook-ceph

    - deviceFilter: sdb
      name: worker001
      resources: {}
End result:
[istacey@master001 ~]$ kubectl -n rook-ceph exec -it rook-ceph-tools-5d9d5db5bc-npz4r  -- ceph status
  cluster:
    id:     13c5138f-f2f6-46ea-8ee0-4966330ac081
    health: HEALTH_OK

  services:
    mon: 3 daemons, quorum a,b,c (age 3h)
    mgr: a(active, since 22h)
    osd: 4 osds: 4 up (since 94m), 4 in (since 94m)

  data:
    pools:   2 pools, 33 pgs
    objects: 5.12k objects, 19 GiB
    usage:   63 GiB used, 137 GiB / 200 GiB avail
    pgs:     33 active+clean

  io:
    client:   49 KiB/s wr, 0 op/s rd, 1 op/s wr

[istacey@master001 ~]$ kubectl -n rook-ceph exec -it rook-ceph-tools-5d9d5db5bc-npz4r  -- ceph osd status
ID  HOST        USED  AVAIL  WR OPS  WR DATA  RD OPS  RD DATA  STATE
0  worker002  12.7G  37.2G      0        0       0        0   exists,up
1  worker003  16.2G  33.7G      1     24.7k      0        0   exists,up
2  worker004  15.2G  34.7G      0        0       0        0   exists,up
3  worker001  18.6G  31.3G      0      819       0        0   exists,up

[istacey@master001 ~]$ kubectl -n rook-ceph exec -it rook-ceph-tools-5d9d5db5bc-npz4r  -- ceph osd tree
ID  CLASS  WEIGHT   TYPE NAME           STATUS  REWEIGHT  PRI-AFF
-1         0.09760  root default
-9         0.02440      host worker001
 3    hdd  0.02440          osd.3           up   1.00000  1.00000
-3         0.02440      host worker002
 0    hdd  0.02440          osd.0           up   1.00000  1.00000
-5         0.02440      host worker003
 1    hdd  0.02440          osd.1           up   1.00000  1.00000
-7         0.02440      host worker004
 2    hdd  0.02440          osd.2           up   1.00000  1.00000
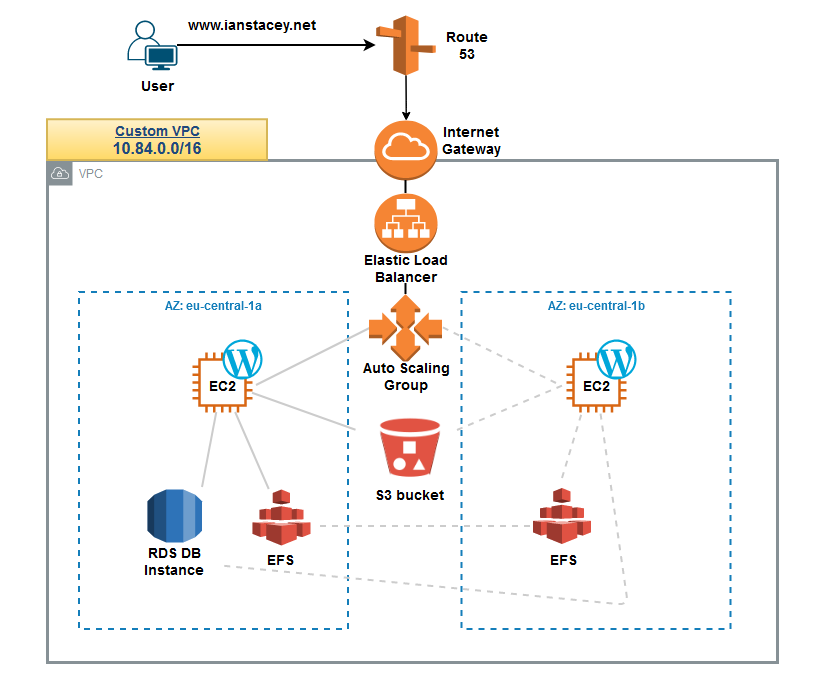
In a previous post I described the creation of this site in AWS. Now is the time to decouple the infrastructure and remove the reliance on the previously created EC2 instance.
By default WordPress is storing data in two different ways, often locally on the same VM/instances.
MySQL database: articles, comments, users and parts of the configuration are stored in a MySQL database, I’m already using an RDS managed MySQL database here to avail of the benefits that brings.
File system: media files uploaded are stored on the file system, in my case under /var/www/html/wp-content. This means if the EC2 instance is terminated that data is lost.
The Aim:
To create an ephemeral, stateless instance, outsourcing content to S3 and EFS.
Create an Auto Scaling group, with a launch template to scale in/out a fleet of instances, in my case, to stick to the free tier, I will set a maximum capacity of 1.
The new infrastructure
EFS: Elastic File System:
Amazon EFS provides scalable file storage for use with Amazon EC2 and I will use it for my wp-content folder. I also have some images stored in S3. Like S3 EFS has resiliency across Availability Zones. With Amazon EFS, you do pay for the resources that you use, but my footprint is very low and I do not expect any charges over a few cents.
To use EFS I:
Created a new EFS file system and mounted as /efs/wp-content
Copied the contents of /var/www/html/wp-content to the temporary mount
Unmounted the EFS and remounted in /var/www/html/wp-content, making the mount persistent by updating /etc/fstab
Check the website and the WordPress Update functionality.
My EFS File System
Auto Scaling:
An Auto Scaling group contains a collection of Amazon EC2 instances that are treated as a logical grouping for the purposes of automatic scaling and management. An Auto Scaling group also enables you to use Amazon EC2 Auto Scaling features such as health check replacements and scaling policies.
Here I:
Created a new AMI from my original EC2 instance
Created a Launch Template (LT) containing the configuration information to launch new instances, including passing specific launch commands in the user data section.
Tested new instances by updating the ELB targets
After successfully testing, I terminated my previous instances, created a new ASG and updated the ELB targets.
ASG
ASG Settings
Wrap Up:
My environment is much more resilient now with no dependency on a single EC2 instance, high-availability has been introduced at all levels, although to keep to the free tier, my RDS DB instance is not Multi-AZ. Next I’ll tear everything down and redeploy with CloudFormation.
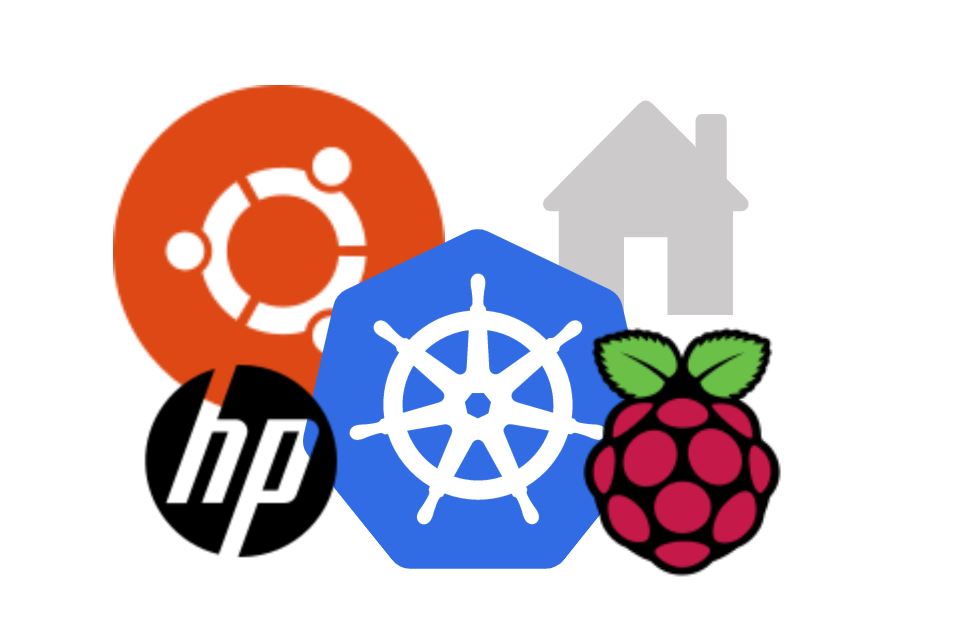
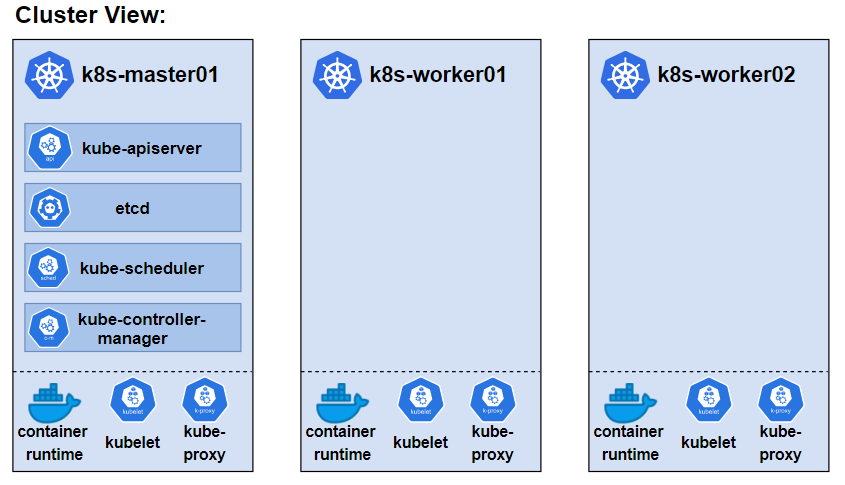
Ideally I wanted to run a home Kubernetes cluster on three or more Raspberry PIs, but at the time of writing I only have one suitable PI 4 at home and stock appears to be in short supply. Instead I will use what I have, mixing and matching devices.
One HP Z200 Workstation with 8GB RAM, running Ubuntu 20.04 with KVM running 2 Ubuntu VMs that I’ll designate as worker nodes in the cluster.
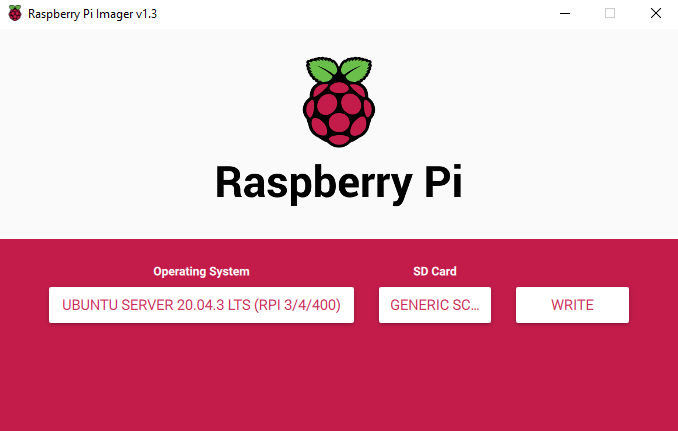
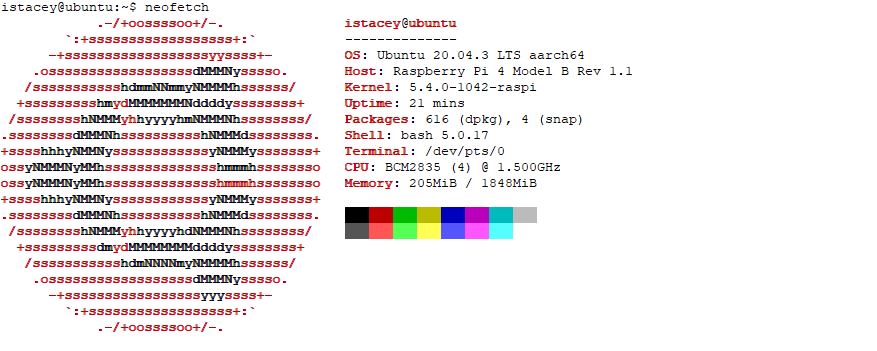
1 Raspberry PI4 Model B 2GB RAM running Ubuntu 20.04 that I’ll use as the Kubernetes Master / Control Plane node.
My makeshift home lab with Stormtrooper on patrol!
Install and Prepare Ubuntu 20.04 on the Z200 / Configure the KVM Hypervisor:
Install Ubuntu on the Z200 Workstation via a bootable USB stick.
Install cpu-checker and verify that the system can use KVM acceleration.
To test KVM, I created a temporary VM via the Virtual Machine Manager GUI (virt-manager), connected to the br0 bridge and used ssh to connect.
Install Vagrant:
KVM is all that is required to create VMs, either manually through the virt-manager GUI or scripted via virt-install, ansible or other automation tool, but for this exercise I thought I’d try Vagrant. I plan to build and rebuild this lab frequently and Vagrant is a popular tool for quickly spinning up VMs. It is not something I’d previously played with, so I thought I’d check it out.
We need to install the libvirt provider plugin as Vagrant is only aware Hyper-V, Docker and Oracle Virtualbox by default as shown below.
Default Vagrant Providers
However I hit the following bug when trying to install:
istacey@ubuntu-z200-01:~/vagrant$ vagrant plugin install vagrant-libvirt
Installing the 'vagrant-libvirt' plugin. This can take a few minutes...
Building native extensions. This could take a while...
Vagrant failed to properly resolve required dependencies. These
errors can commonly be caused by misconfigured plugin installations
or transient network issues. The reported error is:

ERROR: Failed to build gem native extension.

....

common.c:27:10: fatal error: st.h: No such file or directory
   27 | #include <st.h>
      |          ^~~~~~
compilation terminated.
make: *** [Makefile:245: common.o] Error 1

make failed, exit code 2

Gem files will remain installed in /home/istacey/.vagrant.d/gems/3.0.1/gems/ruby-libvirt-0.7.1 for inspection.
Results logged to /home/istacey/.vagrant.d/gems/3.0.1/extensions/x86_64-linux/3.0.0/ruby-libvirt-0.7.1/gem_make.out
After applying the suggested hotfix, I was able to install the plugin and test successfully:
vagrant-libvirt plugin
First Vagrant VM
Vagrant VM and manually provisioned VM running
Create the Worker Node VMs
With KVM working and Vagrant configured we can create the VMs that will become worker nodes in the K8s cluster. Below is my Vagrantfile to spin up two VMs, I referred to https://github.com/vagrant-libvirt/vagrant-libvirt for options:
Vagrant.configure('2') do |config|
  config.vm.box = "generic/ubuntu2004"

  config.vm.define :k8swrk01 do |k8swrk01|
    k8swrk01.vm.hostname = "k8s-worker01"
    k8swrk01.vm.network :private_network, type: "dhcp",
      libvirt__network_name: "br0"
    k8swrk01.vm.provider :kvm do |kvm, override|
      kvm.memory_size     = '2048m'
      kvm.cpus            = '2'
    end
  end

  config.vm.define :k8swrk02 do |k8swrk02|
    k8swrk02.vm.hostname = "k8s-worker02"
    k8swrk02.vm.network :private_network, type: "dhcp",
      libvirt__network_name: "br0"
    k8swrk02.vm.provider :kvm do |kvm, override|
      kvm.memory_size     = '2048m'
      kvm.cpus            = '2'
    end
  end

end
On March 26th of this year, I sat the new AWS Certified SysOps Administrator – Associate SOA-C02 Beta exam, the last day of the Beta period. After what felt like a very long, but not unexpected, wait for the results, I received an email from Credly yesterday informing me I have a new badge for AWS SysOps Administrator. Just to make sure, I logged into my Certmetrics and confirmed the pass! Happy days!
Whilst the merits of the Cloud Practitioner is questionable, I felt it served as a good warm up for two reasons:
A refresher for someone like me who hadn’t sat a professional exam for some time.
A first experience of an online proctored exam, given that test centers were closed due to COVID-19.
Happy I passed and felt confident to move onto tackling the Solutions Architect cert. First, however I successfully sat Microsoft Azure Fundamentals , for which I had a free exam voucher, the content of this exam shared some of the basic principles of cloud computing with Cloud Practitioner and along with previous experience with Azure, this stood me in good stead.
I had started studying for the Architect exam back in January 2020 with Adrians Cantrill’s course on Linux Academy, but work got in the way and by the time I got to focus on the Architect certification again AWS had released the new SAA-C02 version of the exam with new topics added. I opted to study Adrian’s new, comprehensive course at learn.cantrill.io to continue my studies. Thankfully I got my pass and the studies have proved useful as the portion of my job working with AWS grows as more of our Teleco customers adopt cloud services.
An example of the image used in Adrian Cantrill’s courses
SysOps Study
Anyway, back to the subject of this post, the SysOps Associate beta exam…I decided to give the beta a go after seeing posts regarding the new exam on various AWS channels, Reddit, Twitter and Adrian’s Tech Study Slack. Being a beta exam the exam fee was at a reduced rate and the only downslide I saw was having to wait around 90 days for the result as opposed to the instant result on a non-beta exam!
To study this time I opted for Stephane Maarak’s excellent Udemy course. I didn’t quite have the time for Adrians Cantrill’s SysOps course, so I would rely on Stephane’s course, the overlap from Adrian’s Solution Architect course and my growing experience with AWS.
The exam
The exam is split into two parts, the first involving the familar multiple choice and multi-answer questions section and the second part contained a hands-on lab portion. With a total time of 3 hours and 45 minutes to complete all sections, plenty of time is provided and being beta it allows for any issues experienced. On finishing the first portion of 55 questions, I felt ok, but not super confident as some subjects for me at the time were not so familiar.
Sticking to the NDA and without giving anything away, some of the subjects I was not sure about were:
Amazon Elasticsearch Architecture
CloudFormation cross-stack references vs nested-stack
Plus I got two questions on Route 53 around APEX vs NONAPEX DNS Record types, for which I know I opted for the wrong option!
So going into the 3 labs, I felt I’d need to score well to secure a passing mark (720 out of 1000). I had plenty of time remaining for the labs, much longer than the 20 minutes recommended for each, so I took my time and didn’t rush through them, thoroughly checking my work after completing the tasks.
My experience of the labs were good, I believe other people sitting the exam had issues, but I had no such concerns. The labs were setup through a virtual Windows machine with browser access to the AWS console (there is no internet access so you are not able to look at AWS documentation to help implement tasks). On the right hand side of the screen, you are given a scenario, asked to create A B C, or implement X Y Z, using names provided and make sure it works as specified. You follow the requirements, implement the task using the console and complete each lab before moving onto the next (you cannot return to a previously completed lab).
Again sticking to the NDA my three tasks were around:
The setup of a scalable application – configuring a VPC, LT, ASG, ALB, Security, Networking etc
Using AWS config to ensure something is set (compliance)
Configure some S3 data buckets with lifecycle policies
On completing each lab, I felt confident that I’d fully implemented the tasks correctly.
Wrapping Up
I enjoyed the exam, I liked the hands-on section and I expect that element will be added to future AWS exams going forward. I didn’t like the long wait for the results, however, but I knew that beforehand!
The old SOA-C01 SysOps exam is retired from 26th of July. If you are looking to take the new SOA-C02 exam you can find more information on the Coming Soon to AWS Certification page with the exam guide here.
I will look to complete the AWS Certified Developer next to round off all three associate certifications, first however, I want to clear my Certified Kubernetes Administrator (CKA)